Spring 框架给企业软件开发者提供了常见问题的通用解决方案,包括那些在未来开发中没有意识到的问题。但是,它构建的 J2EE 项目变得越来越臃肿,逐渐被 Spring Boot 所替代。Spring Boot 让我们创建和运行项目变得更为迅速,现在已经有越来越多的人使用它。我们已经在几个项目中使用了 Spring Boot ,今天我们就来一起讨论一下如何改进 Spring Boot 应用的性能。
首先,从之前我在开发中遇到的一个问题说起。在一次查看项目运行日志的时候,我偶然发现了一个问题,日志里显示这个项目总是加载 Velocity 模板引擎,但实际上这个项目是一个没有 web 页面的 REST Service 项目。于是我花了一点时间去寻找产生这个问题的原因,以及如何改进 Spring Boot 应用的性能。在查找了相关的资料后,我得出的结论如下:
组件自动扫描带来的问题 默认情况下,我们会使用 @SpringBootApplication 注解来自动获取应用的配置信息,但这样也会给应用带来一些副作用。使用这个注解后,会触发自动配置( auto-configuration )和 组件扫描 ( component scanning ),这跟使用 @Configuration、@EnableAutoConfiguration 和 @ComponentScan 三个注解的作用是一样的。这样做给开发带来方便的同时,也会有三方面的影响:
会导致项目启动时间变长。当启动一个大的应用程序,或将做大量的集成测试启动应用程序时,影响会特别明显。
会加载一些不需要的多余的实例(beans)。
会增加 CPU 消耗。
针对以上三个情况,我们可以移除 @SpringBootApplication 和 @ComponentScan 两个注解来禁用组件自动扫描,然后在我们需要的 bean 上进行显式配置:1
2
3
4
5
6
7
8
9
10
@Configuration
@EnableAutoConfiguration
public class SampleWebUiApplication
@Bean
public MessageController messageController (MessageRepository messageRepository)
return new MessageController(messageRepository);
}
}
如何避免组件自动扫描带来的问题 我们在上面提到,@SpringBootApplication 注解的作用跟 @EnableAutoConfiguration 注解的作用是相当的,那就意味着它也能带来上述的三个问题。要避免这些问题,我们就要知道我们需要的组件列表是哪些,可以用 -Ddebug 的方式来帮助我们明确地定位:1
2
3
4
5
6
7
8
9
10
11
12
13
14
mvn spring-boot:run -Ddebug
…
=========================
AUTO-CONFIGURATION REPORT
=========================
Positive matches:
-----------------
DispatcherServletAutoConfiguration
- @ConditionalOnClass classes found: org.springframework.web.servlet.DispatcherServlet (OnClassCondition)
- found web application StandardServletEnvironment (OnWebApplicationCondition)
...
接着拷贝 Positive matches 中列出的信息:1
2
3
4
5
6
7
8
9
10
11
12
13
DispatcherServletAutoConfiguration
EmbeddedServletContainerAutoConfiguration
ErrorMvcAutoConfiguration
HttpEncodingAutoConfiguration
HttpMessageConvertersAutoConfiguration
JacksonAutoConfiguration
JmxAutoConfiguration
MultipartAutoConfiguration
ServerPropertiesAutoConfiguration
PropertyPlaceholderAutoConfiguration
ThymeleafAutoConfiguration
WebMvcAutoConfiguration
WebSocketAutoConfiguration
然后来更新项目配置,显式地引入这些组件,引入之后,再运行一下应用确保没有错误发生:1
2
3
4
5
6
7
8
9
10
11
12
13
14
15
16
17
@Configuration
@Import ({
DispatcherServletAutoConfiguration.class,
EmbeddedServletContainerAutoConfiguration.class,
ErrorMvcAutoConfiguration.class,
HttpEncodingAutoConfiguration.class,
HttpMessageConvertersAutoConfiguration.class,
JacksonAutoConfiguration.class,
JmxAutoConfiguration.class,
MultipartAutoConfiguration.class,
ServerPropertiesAutoConfiguration.class,
PropertyPlaceholderAutoConfiguration.class,
ThymeleafAutoConfiguration.class,
WebMvcAutoConfiguration.class,
WebSocketAutoConfiguration.class,
})
public class SampleWebUiApplication
在上面的代码中,我们可以删掉我们不需要的组件信息,来提高应用的性能,比如在我的项目中,不需要 JMX 和 WebSocket 功能,我就删掉了它们。删掉之后,再次运行项目,确保一切正常。
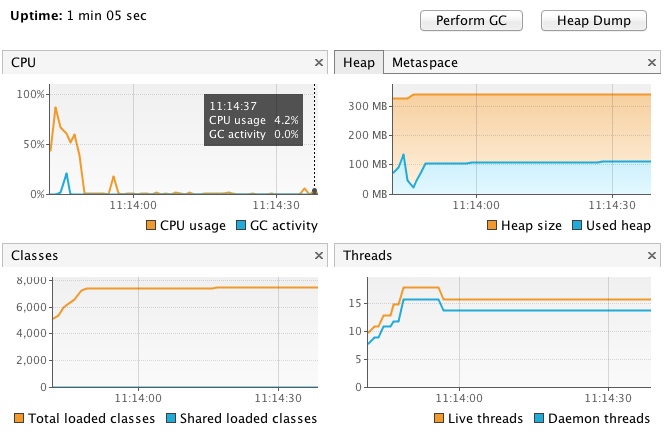
将Servlet容器变成Undertow 默认情况下,Spring Boot 使用 Tomcat 来作为内嵌的 Servlet 容器。我们可以启动项目,然后用 VisualVM 或者 JConsole 来查看应用所占的内存情况:Web 服务器切换到 Undertow 来提高应用性能 。Undertow 是一个采用 Java 开发的灵活的高性能 Web 服务器,提供包括阻塞和基于 NIO 的非堵塞机制。Undertow 是红帽公司的开源产品,是 Wildfly 默认的 Web 服务器。首先,从依赖信息里移除 Tomcat 配置:1
2
3
4
5
6
<exclusions >
<exclusion >
<groupId > org.springframework.boot</groupId >
<artifactId > spring-boot-starter-tomcat</artifactId >
</exclusion >
</exclusions >
然后添加 Undertow:1
2
3
4
<dependency >
<groupId > org.springframework.boot</groupId >
<artifactId > spring-boot-starter-undertow</artifactId >
</dependency >
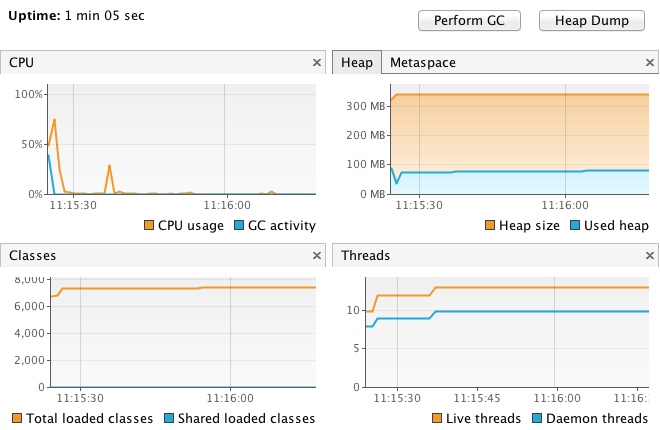
启动项目后,用 VisualVM 监控到的信息显示:堆内存占用 90M,13个线程被开启。
总结 这些都是我们在项目开发中使用到的一些优化 Spring Boot 应用的小技巧,对于大的应用性能的提高还是很明显的。大家可以尝试一下!Spring Boot Performance Spring Boot Memory Performance https://www.techempower.com/benchmarks/ Optimizing Spring Framework for App Engine Applications